Friday, August 31, 2012

IOPS: Performance Capacity Planning Explained


Overview
In this post, I’ll be discussing how to plan storage performance capacity via IOPS.
Situation
Let say as an IT Admin, you’re presented with a storage migration task, or a deployment of additional iSCSI Storage for growing application servers, such as Microsoft Exchange Server or VMware ESX Hypervisor. The question is – how does an IT admin determine the performance needed to handle the newly requested duties? I was recently presented with this task, as a growing divisional office was growing beyond the capabilities of their five-year-old storage system – and they were torn between the RS2211RP+ and the RS3411RPxs. Both offer more than enough capacity for their needs – the question was the performance. Well, after further analysis of their storage needs and usage behavior of everyone in the office – it was determined that all that is required is a RS2211RP+ to meet their needs. In this post – I’ll be covering a discussion about the IOP – which is one of two performance benchmarks in the storage industry.
What are IOPS?
Previously – to measure a storage system performance capability was to measure its throughput, typically by a single computer. Throughput measures the average number of megabytes transferred within a given period of a specific file size. However, using throughput at the scale of larger storage system isn’t accurate enough – as most of the time, when requesting data from a storage server – it’s typically a lot of small read/writes of packets of data and not a single computer conducting a single large file request. Measuring the storage system’s ability of handling numerous small packets of data requests requires a more advanced benchmark, which is the IOPS.
IOPS (Input/Output Operations per Second) measure the number of operations per second that a storage system can perform. IOPS offers a different way of measuring activity, as it can be used to simulate multi-user behavior – as the cumulative total of user access is essentially the number of IOPS being requested to the storage array at a given time.
How to determine how many IOPS you need
Here is how IT Admins can determine the IOPS currently used by their current applications, which is the best recommend practice by most solution providers. First, evaluate the current performance usage of what the server is performing over a period of thirty days, such as during the beginning of the business day, mid-day, closing hours, and when backups are occurring. From here, a sampling of data can be generated and help determine how many IOPS an application server is using. Here are a couple of examples below.
Microsoft Windows

View of my Windows workstation, an average of 18 IOPS @ 64K, running multiple office applications, multiple multi-tab browsers, and multiple multimedia applications concurrently.Ref: 1, 2, 3
VMware ESXi

View of a production use VMware Server – note that in the image that the performance of the machine does not show high amount of single throughput (about 11.3MB/Sec Read, 1.6MB/Sec Write) – but high amounts of IOPS being requested.Ref: 4
Estimating IOPS performance needed
Here, is information gathered from various websites, which can help estimate the number of IOPS needed. While this information is useful for providing an estimation, it doesn’t replace conducting an evaluation of the current performance utilization of an application server.
  • Microsoft Exchange 2010 ServerRef: 5
    • Assuming 5000 users that send/receive 500 emails a day, an estimated total of 3000 IOPS is needed
  • Microsoft Exchange 2003 ServerRef: 6
    • Assuming 5000 users are sending 60, receiving 150 emails a day, an estimated total of 7500 IOPS is needed
  • Microsoft SQL 2008 Server, cited by VMwareRef: 7
    • 3557 SQL TPS generates 29,000 IOPS
  • Various Windows ServersRef: 8
    • Community Discussion: between 10-40 IOPS per Server
  • Oracle Database Server, cited by VMwareRef: 9
    • 100 Oracle TPS generates 1,200 IOPS
How to measure IOPS
Typically speaking – IOPS can be measured as 100% Read Event, or 100% Write Event; although this is seldom the case in the real world. Mixed performance can also be measuredRef: 6, along with using typical IOP size (or block size) of 4KB, upwards to 32KB. The number of IOPS will vary depending on the IOP size, where typically, a smaller IOP size will result in a greater number of IOPS. In contrast, a larger IOP size results in higher throughput – but lower IOPS.

DHCP Server and Clients Communication


  1. The DHCP client broadcasts a DHCP discover message to the local subnet.
  2. A DHCP server can respond with a DHCP offer message (DHCPOFFER) that contains an offered IP address for lease to the client.
  3. If no DHCP servers respond to the client discovery request, the client can proceed in either of two ways:
    • If the client is running under Windows 2000 and IP auto-configuration has not been disabled, the client self-configures an IP address for use with automatic client configuration.
    • If the client is not running under Windows 2000 (or IP auto-configuration has been disabled), the client fails to initialize. Instead, if left running, it continues to resend DHCP discover messages in the background (four times every five minutes) until it receives a DHCP offer message from a server.
  4. As soon as a DHCP offer message is received, the client selects the offered address by replying to the server with a DHCP request.
  5. Typically, the offering server sends a DHCP acknowledgement message (DHCPACK) , approving the lease.
    Also, other DHCP options information is included in the acknowledgement.
  6. Once the client receives acknowledgment, it configures its TCP/IP properties using the information in the reply and joins the network.

Superscopes in DHCP


A superscope is an administrative feature of DHCP servers running Windows Server 2003 that you can create and manage through the DHCP console. Using a superscope, you can group multiple scopes as a single administrative entity. With this feature, a DHCP server can:

  • Support DHCP clients on a single physical network segment (such as a single Ethernet LAN segment) where multiple logical IP networks are used. When more than one logical IP network is used on each physical subnet or network, such configurations are often called multinets.
  • Support remote DHCP clients located on the far side of DHCP and BOOTP relay agents (where the network on the far side of the relay agent uses multinets).
In multinet configurations, you can use DHCP superscopes to group and activate individual scope ranges of IP addresses used on your network. In this way, the DHCP server computer can activate and provide leases from more than one scope to clients on a single physical network.

Superscopes can resolve certain types of DHCP deployment issues for multinets, including situations in which:
  • The available address pool for a currently active scope is nearly depleted, and more computers need to be added to the network. The original scope includes the full addressable range for a single IP network of a specified address class. You need to use another IP network range of addresses to extend the address space for the same physical network segment.
  • Clients must be migrated over time to a new scope (such as to renumber the current IP network from an address range used in an existing active scope to a new scope that contains another IP network range of addresses).
  • You want to use two DHCP servers on the same physical network segment to manage separate logical IP networks.

Example 1: Non-routed DHCP server (before superscope)


Single subnet and DHCP server (before superscope)

Example 2: Superscope for non-routed DHCP server supporting local multinets


Superscope for non-routed DHCP server

Conditional Forwarding in Windows 2003 DNS


Let us begin by discovering where you configure Conditional Forwarding.  Start at the server icon in the DNS snap-in (not the Forward Lookup Zone).  right-click, properties, Forwarders (Tab).


Take the scenario where shootemup.com is an associate of your organization.  Moreover, your users are for ever querying their server.  If shootemup.com kindly provide the IP address of their server which is authoritative for shootemup.com then you can configure that server as a conditional forwarder.
To summarise, the Condition is that one of your clients query is for shootemup.com.  The Forwarding is to the IP address specified at the Forwarders tab of your DNS server.
So what would happen without Conditional Forwarding?  The answer is that your server would ' walk the root hints '.  The server (Alan in the diagram), contacts the root server ' . ' on the internet.  The root server forwards your request to the .com server who in turn forwards the request to shootemup.com's server.
In a nutshell, Conditional Forwarding is like taking a short cut.

DNS Root Hints

Well at some point your DNS server is going to have to query other DNS servers for domains that it is not authorative for. Your two choices for this are: 1. Using forwarders or 2. Using the root hint servers.

If you choose to use forwarders then you'll need to set them up in the properties of your DNS server. Then when your DNS server gets a DNS query for a domain that it is not authorative for it will forward the query to the forwarder, which will then do the work of resolving the query if it's configured to perform iteration or if it's not it will tell your DNS server where to go next.

If you choose to use the root hint servers, then when your DNS servers gets a DNS query for a domain that it is not authorative for it will query one of the root hint servers (which will not perform iteration) which will tell your DNS server where to go next. IMHO, there's no real workload on a DNS server for it to resolve DNS queries unless you have thousands of queries per second needing to be resolved.

Your server should not be listed in the root hint servers as your server is not one of the root hint servers.

I prefer to use the root hint servers. I don't like to rely on forwarders as then my DNS queries are dependent on the forwarders being available, working properly, performing iteration, etc., etc.

If the root hint servers aren't working (which is highly unlikely) then nobody in the world is going to have a working DNS anyway so it won't matter that my DNS won't be working at that point (for external DNS queries only).


Every Windows server comes pre-configured with a physical file called cache.dns.  Inside cache.dns are the IP addresses of a dozen 'well-known' servers which hold information about the .com, .net, .org and other top level domains (TLD).  You can inspect this file in the %systemroot%\windows32\dns\samples folder.


Point each DNS server at itself for the preferred DNS server and the other server for the alternate DNS server in IP address configuration for DNS servers.

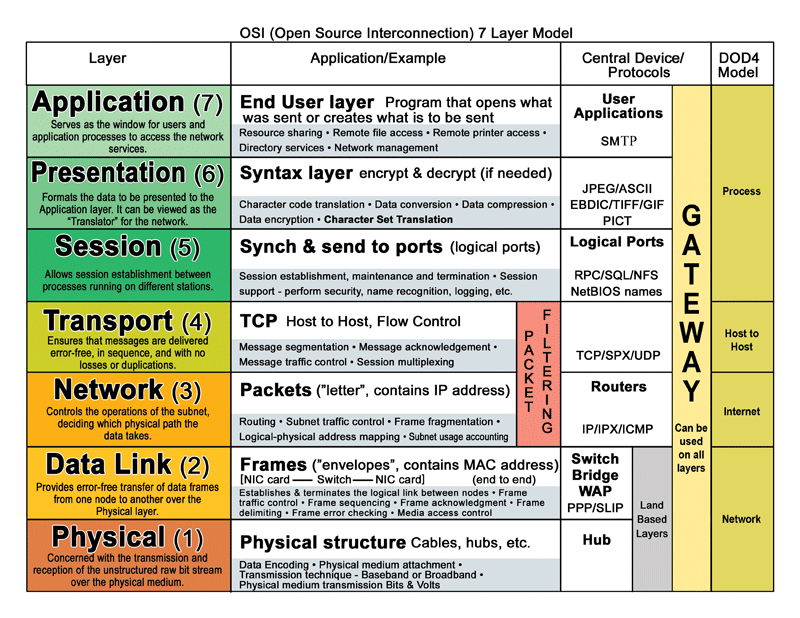
OSI 7 Layer Model


OSI OSI 7 Layer Model
7. Application Layer - DHCP, DNS, FTP, HTTP, IMAP4, NNTP, POP3, SMTP, SNMP, SSH, TELNET and NTPmore)
6. Presentation layer – SSL, WEP, WPA, Kerberos,
5. Session layer – Logical Ports 21, 22, 23, 80 etc…
4. Transport - TCP, SPX and UDPmore)
3. Network - IPv4, IPV6, IPX, OSPF, ICMP, IGMP and ARPMP
2. Data Link- 802.11 (WLAN), Wi-Fi, WiMAX, ATM, Ethernet, Token Ring, Frame Relay, PPTP, L2TP and ISDN-ore)
1. Physical-Hubs, Repeaters, Cables, Optical Fiber, SONET/SDN,Coaxial Cable, Twisted Pair Cable and Connectors (more)

The Open Systems Interconnect (OSI) model has seven layers. This article describes and explains them, beginning with the 'lowest' in the hierarchy (the physical) and proceeding to the 'highest' (the application). The layers are stacked this way:

  • Application
  • Presentation
  • Session
  • Transport
  • Network
  • Data Link
  • Physical

PHYSICAL LAYER

The physical layer, the lowest layer of the OSI model, is concerned with the transmission and reception of the unstructured raw bit stream over a physical medium. It describes the electrical/optical, mechanical, and functional interfaces to the physical medium, and carries the signals for all of the higher layers. It provides:
  • Data encoding: modifies the simple digital signal pattern (1s and 0s) used by the PC to better accommodate the characteristics of the physical medium, and to aid in bit and frame synchronization. It determines:

    • What signal state represents a binary 1
    • How the receiving station knows when a "bit-time" starts
    • How the receiving station delimits a frame
  • Physical medium attachment, accommodating various possibilities in the medium:

    • Will an external transceiver (MAU) be used to connect to the medium?
    • How many pins do the connectors have and what is each pin used for?
  • Transmission technique: determines whether the encoded bits will be transmitted by baseband (digital) or broadband (analog) signaling.
  • Physical medium transmission: transmits bits as electrical or optical signals appropriate for the physical medium, and determines:

    • What physical medium options can be used
    • How many volts/db should be used to represent a given signal state, using a given physical medium

DATA LINK LAYER

The data link layer provides error-free transfer of data frames from one node to another over the physical layer, allowing layers above it to assume virtually error-free transmission over the link. To do this, the data link layer provides: 

  • Link establishment and termination: establishes and terminates the logical link between two nodes.
  • Frame traffic control: tells the transmitting node to "back-off" when no frame buffers are available.
  • Frame sequencing: transmits/receives frames sequentially.
  • Frame acknowledgment: provides/expects frame acknowledgments. Detects and recovers from errors that occur in the physical layer by retransmitting non-acknowledged frames and handling duplicate frame receipt.
  • Frame delimiting: creates and recognizes frame boundaries.
  • Frame error checking: checks received frames for integrity.
  • Media access management: determines when the node "has the right" to use the physical medium.

NETWORK LAYER

The network layer controls the operation of the subnet, deciding which physical path the data should take based on network conditions, priority of service, and other factors. It provides: 

  • Routing: routes frames among networks.
  • Subnet traffic control: routers (network layer intermediate systems) can instruct a sending station to "throttle back" its frame transmission when the router's buffer fills up.
  • Frame fragmentation: if it determines that a downstream router's maximum transmission unit (MTU) size is less than the frame size, a router can fragment a frame for transmission and re-assembly at the destination station.
  • Logical-physical address mapping: translates logical addresses, or names, into physical addresses.
  • Subnet usage accounting: has accounting functions to keep track of frames forwarded by subnet intermediate systems, to produce billing information.

Communications Subnet

The network layer software must build headers so that the network layer software residing in the subnet intermediate systems can recognize them and use them to route data to the destination address. 

This layer relieves the upper layers of the need to know anything about the data transmission and intermediate switching technologies used to connect systems. It establishes, maintains and terminates connections across the intervening communications facility (one or several intermediate systems in the communication subnet). 

In the network layer and the layers below, peer protocols exist between a node and its immediate neighbor, but the neighbor may be a node through which data is routed, not the destination station. The source and destination stations may be separated by many intermediate systems.

TRANSPORT LAYER

The transport layer ensures that messages are delivered error-free, in sequence, and with no losses or duplications. It relieves the higher layer protocols from any concern with the transfer of data between them and their peers. 

The size and complexity of a transport protocol depends on the type of service it can get from the network layer. For a reliable network layer with virtual circuit capability, a minimal transport layer is required. If the network layer is unreliable and/or only supports datagrams, the transport protocol should include extensive error detection and recovery. 

The transport layer provides:
  • Message segmentation: accepts a message from the (session) layer above it, splits the message into smaller units (if not already small enough), and passes the smaller units down to the network layer. The transport layer at the destination station reassembles the message.
  • Message acknowledgment: provides reliable end-to-end message delivery with acknowledgments.
  • Message traffic control: tells the transmitting station to "back-off" when no message buffers are available.
  • Session multiplexing: multiplexes several message streams, or sessions onto one logical link and keeps track of which messages belong to which sessions (see session layer).
Typically, the transport layer can accept relatively large messages, but there are strict message size limits imposed by the network (or lower) layer. Consequently, the transport layer must break up the messages into smaller units, or frames, prepending a header to each frame. 

The transport layer header information must then include control information, such as message start and message end flags, to enable the transport layer on the other end to recognize message boundaries. In addition, if the lower layers do not maintain sequence, the transport header must contain sequence information to enable the transport layer on the receiving end to get the pieces back together in the right order before handing the received message up to the layer above.

End-to-end layers

Unlike the lower "subnet" layers whose protocol is between immediately adjacent nodes, the transport layer and the layers above are true "source to destination" or end-to-end layers, and are not concerned with the details of the underlying communications facility. Transport layer software (and software above it) on the source station carries on a conversation with similar software on the destination station by using message headers and control messages.

SESSION LAYER

The session layer allows session establishment between processes running on different stations. It provides: 

  • Session establishment, maintenance and termination: allows two application processes on different machines to establish, use and terminate a connection, called a session.
  • Session support: performs the functions that allow these processes to communicate over the network, performing security, name recognition, logging, and so on.

PRESENTATION LAYER

The presentation layer formats the data to be presented to the application layer. It can be viewed as the translator for the network. This layer may translate data from a format used by the application layer into a common format at the sending station, then translate the common format to a format known to the application layer at the receiving station. 

The presentation layer provides: 

  • Character code translation: for example, ASCII to EBCDIC.
  • Data conversion: bit order, CR-CR/LF, integer-floating point, and so on.
  • Data compression: reduces the number of bits that need to be transmitted on the network.
  • Data encryption: encrypt data for security purposes. For example, password encryption.

APPLICATION LAYER


The application layer serves as the window for users and application processes to access network services. This layer contains a variety of commonly needed functions: 

  • Resource sharing and device redirection
  • Remote file access
  • Remote printer access
  • Inter-process communication
  • Network management
  • Directory services
  • Electronic messaging (such as mail)
  • Network virtual terminals

Tuesday, August 28, 2012

Windows Vista, Windows 7 startup process

The startup process of Windows Vista, Windows Server 2008, Windows 7 and Windows Server 2008 R2 is different from previous versions of Windows. For Windows Vista, the boot sector loads the Windows Boot Manager (hidden system file BOOTMGR in the C: root directory), which first looks for an active partition, then accesses the Boot Configuration Data store and uses the information to load the operating system.

Boot Configuration Data

Boot Configuration Data (BCD) is a firmware-independent database for boot-time configuration data. It replaces the boot.ini that was used by NTLDR, and is used by Microsoft's new Windows Boot Manager.
Boot Configuration Data are stored in a data file that has the same format as the Windows Registry.[1] The file is located either on the EFI System Partition (on machines that use Extensible Firmware Interface firmware) or in \Boot\Bcd on the system volume (on machines that use IBM PC compatible firmware).

Boot Configuration Data may be altered using a command-line tool (bcdedit.exe), using Registry Editor (regedit.exe), using Windows Management Instrumentation, or with third party tools like EasyBCD.
Boot Configuration Data contain the menu entries that are presented by the Windows Boot Manager, just as boot.ini contained the menu entries that were presented by NTLDR. These menu entries can include:
  • Options to boot Windows Vista by invoking winload.exe.
  • Options to resume Windows Vista from hibernation by invoking winresume.exe.
  • Options to boot a prior version of the Windows NT family by invoking its NTLDR.
  • Options to load and to execute a volume boot record.
Boot Configuration Data allows for third party integration so anyone can implement tools like diagnostics or recovery options.

winload.exe  

The Windows Boot Manager invokes winload.exe—the operating system boot loader—to load the operating system kernel (ntoskrnl.exe) and (boot-class) device drivers. In that respect, winload.exe is functionally equivalent to the operating system loader function of NTLDR in prior versions of Windows NT.


What is difference between ide sata and scsi hard disk?

For years the parallel interface has been widely used in storage systems. The need for increased bandwidth and flexibility in storage systems made the SCSI and ATA standards an inefficient option. A parallel interface is a channel capable of transferring date in parallel mode - that is transmitting multiple bits simultaneously. Almost all personal computers come with at least one parallel interface. Common parallel interfaces include SCSI and ATA.

SCSI
(sku4zē) Short for small computer system interface, a parallel interface standard used by Apple Macintosh computers, PCs and many UNIX systems for attaching peripheral devices to computers. Nearly all Apple Macintosh computers, excluding only the earliest Macs and the recent iMac, come with a SCSI port for attaching devices such as disk drives and printers. SCSI interfaces provide for data transmission rates (up to 80 megabytes per second). In addition, you can attach multiple devices to a single SCSI port, so that SCSI is really an I/O bus rather than simply an interface.

ATA
(Also known as IDE) is a disk drive implementation that integrates the controller on the disk drive itself. ATA is used to connect hard disk drives, CD-ROM drives and similar peripherals and supports 8/16-bit interface that transfer up to 8.3MB/s for ATA-2 and up to 100MB/s (ATA-6).
So, what do parallel interfaces have to do with SAS (Serial Attached SCSI) and SATA (Serial ATA)? A lot, actually. It is the architectural limitations of the parallel interfaces that serial technologies like SAS and SATA address. In contrast to multiple parallel data stream, data is transmitted serially, that is in a single steam, by wrapping multiple bits into packets and it is able to move that single stream faster than parallel technology.

Serial Attached SCSI (SAS)
Abbreviated as SAS, Serial Attached SCSI, an evolution of parallel SCSI into a point-to-point serial peripheral interface in which controllers are linked directly to disk drives. SAS is a performance improvement over traditional SCSI because SAS enables multiple devices (up to 128) of different sizes and types to be connected simultaneously with thinner and longer cables; its full-duplex signal transmission supports 3.0Gb/s. In addition, SAS drives can be hot-plugged.

Serial ATA (SATA)
Often abbreviated as SATA, Serial ATA is an evolution of the Parallel ATA physical storage interface. Serial ATA is a serial link - a single cable with a minimum of four wires creates a point-to-point connection between devices. Transfer rates for Serial ATA begin at 150MB/s.
Starting with SATA, it extends the capabilities of ATA and offers transfer rates starting at 150MB/s and, after years of development, has moved to the mainstream of disk interfaces. The successor the SCSI interface is SAS at speeds of up to 3Gb/s. Additionally, it also addresses parallel interface issues such as drive addressability and limitations on the number of device per port connection.
SAS devices can communicate with both SATA and SCSI devices (the backplanes of SAS devices are identical to SATA devices). A key difference between SCSI and SAS devices is the addition in SAS devices of two data ports, each of which resides in a different SAS domain. This enables complete failover redundancy. If one path fails, there is still communication along a separate and independent path.

Cables & Connectors
Another big advantage of SATA over ATA is the cabling and connectors. The serial interface reduces the amount of wires needed to transmit data, making for much smaller cable size and making it easier to route and install SATA devices. The IDE cables used in parallel ATA systems are bulkier than Serial ATA cables and can only extend to 40cm long, while Serial ATA cables can extend up to one meter. In addition to the cabling, a new design of connectors is also used that reduces the amount of crosstalk between the wires, and the connector design also provides easier routing and better air flow.

The Benefits of SAS & SATA in Storage
Serial interfaces offer an improvement over older parallel SCSI (with a serial version) in storage applications and environments. These benefits include better performance, better scalability, and also better reliability as the parallel interfaces are at their limits of speed with reliable data transfers. SAS and SATA drives can also operate in the same environment while SCSI and ATA cannot. For example, using faster SAS drives for primary storage and offloading older data to cheaper SATA disks in the same subsystem, something that could not be achieved with SCSI and ATA.

Monday, August 27, 2012

NAS - SAN Technology and their differences

At first glance NAS and SAN might seem almost identical, and in fact many times either will work in a given situation. After all, both NAS and SAN generally use RAID connected to a network, which then are backed up onto tape. However, there are differences -- important differences -- that can seriously affect the way your data is utilized. For a quick introduction to the technology, take a look at the diagrams below.

Wires and Protocols
Most people focus on the wires, but the difference in protocols is actually the most important factor. For instance, one common argument is that SCSI is faster than ethernet and is therefore better. Why? Mainly, people will say the TCP/IP overhead cuts the efficiency of data transfer. So a Gigabit Ethernet gives you throughputs of 600-800 Mbps rather than 1000Mbps.But consider this: the next version of SCSI (due date ??) will double the speed; the next version of ethernet (available in beta now) will multiply the speed by a factor of 10. Which will be faster? Even with overhead? It's something to consider.
The Wires
--NAS uses TCP/IP Networks: Ethernet, FDDI, ATM (perhaps TCP/IP over Fibre Channel someday)
--SAN uses Fibre Channel
--Both NAS and SAN can be accessed through a VPN for security
The Protocols
--NAS uses TCP/IP and NFS/CIFS/HTTP
--SAN uses Encapsulated SCSI
More Differences
NAS
 
SAN
Almost any machine that can connect to the LAN (or is interconnected to the LAN through a WAN) can use NFS, CIFS or HTTP protocol to connect to a NAS and share files. Only server class devices with SCSI Fibre Channel can connect to the SAN. The Fibre Channel of the SAN has a limit of around 10km at best
A NAS identifies data by file name and byte offsets, transfers file data or file meta-data (file's owner, permissions, creation data, etc.), and handles security, user authentication, file locking A SAN addresses data by disk block number and transfers raw disk blocks.
A NAS allows greater sharing of information especially between disparate operating systems such as Unix and NT. File Sharing is operating system dependent and does not exist in many operating systems.
File System managed by NAS head unit File System managed by servers
Backups and mirrors (utilizing features like NetApp's Snapshots) are done on files, not blocks, for a savings in bandwidth and time. A Snapshot can be tiny compared to its source volume. Backups and mirrors require a block by block copy, even if blocks are empty. A mirror machine must be equal to or greater in capacity compared to the source volume.

Standard RAID levels


Following is a brief textual summary of the most commonly used RAID levels.[7]
  • RAID 0 (block-level striping without parity or mirroring) has no (or zero) redundancy. It provides improved performance and additional storage but no fault tolerance. Hence simple stripe sets are normally referred to as RAID 0. Any drive failure destroys the array, and the likelihood of failure increases with more drives in the array (at a minimum, catastrophic data loss is almost twice as likely compared to single drives without RAID). A single drive failure destroys the entire array because when data is written to a RAID 0 volume, the data is broken into fragments called blocks. The number of blocks is dictated by the stripe size, which is a configuration parameter of the array. The blocks are written to their respective drives simultaneously on the same sector. This allows smaller sections of the entire chunk of data to be read off each drive in parallel, increasing bandwidth. RAID 0 does not implement error checking, so any error is uncorrectable. More drives in the array means higher bandwidth, but greater risk of data loss.
          RAID Level 0
  • In RAID 1 (mirroring without parity or striping), data is written identically to two drives, thereby producing a "mirrored set"; at least two drives are required to constitute such an array. While more constituent drives may be employed, many implementations deal with a maximum of only two; of course, it might be possible to use such a limited level 1 RAID itself as a constituent of a level 1 RAID, effectively masking the limitation.[citation needed] The array continues to operate as long as at least one drive is functioning. With appropriate operating system support, there can be increased read performance, and only a minimal write performance reduction; implementing RAID 1 with a separate controller for each drive in order to perform simultaneous reads (and writes) is sometimes called multiplexing (or duplexing when there are only two drives). WARNING: RAID 1 is not necessarily safe. In PC systems most HDD are shipped by manufacturers with "write cacheing" turned on; this gives an illusion of higher performance but at the risk of data not being written; failure for some reason (eg. power) can leave the two disks in an inconsistent state and even make them unrecoverable.
          RAID Level 1
  • In Raid Raid 10' (mirroring and striping), data is written in stripes across the primary disks and then mirrored to the secondary disks. A typical RAID 10 format consist of four drives. Two for striping and two for mirroring. A RAID 10 configuration takes the best concepts of RAID 0 and RAID 1 and combines them to provide better performance along with the reliability of parity without actually having parity such as Raid 5 and Raid 6. Raid 10 is often referred to as Raid 1+0 (mirrored+striped).
          
  • In RAID 2 (bit-level striping with dedicated Hamming-code parity), all disk spindle rotation is synchronized, and data is striped such that each sequential bit is on a different drive. Hamming-code parity is calculated across corresponding bits and stored on at least one parity drive.
          RAID Level 2
  • In RAID 3 (byte-level striping with dedicated parity), all disk spindle rotation is synchronized, and data is striped so each sequential byte is on a different drive. Parity is calculated across corresponding bytes and stored on a dedicated parity drive.
          RAID Level 3
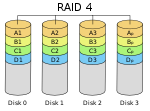
  • RAID 4 (block-level striping with dedicated parity) is identical to RAID 5 (see below), but confines all parity data to a single drive. In this setup, files may be distributed between multiple drives. Each drive operates independently, allowing I/O requests to be performed in parallel. However, the use of a dedicated parity drive could create a performance bottleneck; because the parity data must be written to a single, dedicated parity drive for each block of non-parity data, the overall write performance may depend a great deal on the performance of this parity drive.
          RAID Level 4
  • RAID 5 (block-level striping with distributed parity) distributes parity along with the data and requires all drives but one to be present to operate; the array is not destroyed by a single drive failure. Upon drive failure, any subsequent reads can be calculated from the distributed parity such that the drive failure is masked from the end user. However, a single drive failure results in reduced performance of the entire array until the failed drive has been replaced and the associated data rebuilt. Additionally, there is the potentially disastrous RAID 5 write hole. RAID 5 requires at least three disks.
          RAID Level 5
  • RAID 6 (block-level striping with double distributed parity) provides fault tolerance of two drive failures; the array continues to operate with up to two failed drives. This makes larger RAID groups more practical, especially for high-availability systems. This becomes increasingly important as large-capacity drives lengthen the time needed to recover from the failure of a single drive. Single-parity RAID levels are as vulnerable to data loss as a RAID 0 array until the failed drive is replaced and its data rebuilt; the larger the drive, the longer the rebuild takes. Double parity gives additional time to rebuild the array without the data being at risk if a single additional drive fails before the rebuild is complete. Like RAID 5, a single drive failure results in reduced performance of the entire array until the failed drive has been replaced and the associated data rebuilt.
          RAID Level 6


The following table provides an overview of the most important parameters of standard RAID levels. In each case:

  • Array space efficiency is given as an expression in terms of the number of drives, n; this expression designates a value between 0 and 1, representing the fraction of the sum of the drives' capacities that is available for use. For example, if three drives are arranged in RAID 3, this gives an array space efficiency of 1 - (1/n) = 1 - (1/3) = 2/3 (approximately 66%); thus, if each drive in this example has a capacity of 250 GB, then the array has a total capacity of 750 GB but the capacity that is usable for data storage is only 500 GB.
  • Array failure rate is given as an expression in terms of the number of drives, n, and the drive failure rate, r (which is assumed to be identical and independent for each drive). For example, if each of three drives has a failure rate of 5% over the next 3 years, and these drives are arranged in RAID 3, then this gives an array failure rate of n(n-1)r^2 = 3(3-1)(5%)^2 = 3(2)(0.0025) = 0.015 = 1.5% over the next 3 years.

Level
Description
Minimum # of drives**
Space Efficiency
Fault Tolerance
Array Failure Rate***
Read Benefit
Write Benefit
Block-level striping withoutparity or mirroring.
2
1
0 (none)
1−(1−r)n
nX
nX
Mirroring without parity or striping.
2
1/n
n−1 drives
rn
nX
1X
Bit-level striping with dedicated Hamming-codeparity.
3
1 − 1/n log2(n-1)
RAID 2 can recover from 1 drive failure or repair corrupt data or parity when a corrupted bit's corresponding data and parity are good.
variable
variable
variable
Byte-level striping with dedicated parity.
3
1 − 1/n
1 drive
n(n−1)r2
(n−1)X
(n−1)X*
Block-level striping with dedicated parity.
3
1 − 1/n
1 drive
n(n−1)r2
(n−1)X
(n−1)X*
Block-level striping with distributed parity.
3
1 − 1/n
1 drive
n(n−1)r2
(n−1)X*
(n−1)X*
Block-level striping with double distributed parity.
4
1 − 2/n
2 drives
n(n-1)(n-2)r3
(n−2)X*
(n−2)X*