I’ve prepared a complete guide to configure a WDS Server on Windows Server 2008 or Windows Server 2003 to deploy complete operating systems images, this is the first part. In this post I’ll be setting the WDS requirements, installation, first configurations and images needed.
Introduction
Deploying operating systems it’s always a hard thing to do. Annoying, uncomfortable, but necessary for every environment. Why? Because every desktop computer on every organization has their own life cycle (even servers, a longer one, but cycle at last).
Even if your organization doesn’t have many desktops and even if those desktops don’t seem to need an image refresh in several months; the dynamics of today’s technology makes your base operating systems to change: Updates available, service packs, a new version of your organization’s software, newer operating systems, etc. And don’t forget the consequences of any user’s intervention: overloading the hard drive, personal software installation, etc; transforming always into a need to a fresh new installation. No need to keep enumerating things that normally happens; you probably know all of them.
Common Base Image Life Cycle

The bottom line is that a good and automated system to deploy your full operating systems images will significantly (and I do mean significantly) improve your daily tasks: Making an awkward job of following the installations steps for maybe 2 or 3 hours and transforming it to 30mins of a complete unattended provisioning. Here’s where Windows Deployment Services comes to play.
Also you can find the Microsoft document “Deploying and Managing the Windows Deployment Services Update on Windows Server 2003”.
Requirements
- Windows Server 2008 or Windows Server 2003 SP2 * for the WDS server .
- Active Directory and DNS up and working.
- DHCP server available and authorized by Active Directory on your network. Linux DHCP servers do not need to be authorized by AD.
- On the client side: NICs PXE compliant.
Almost all of Network Adapter that are available for several years now are in fact PXE compliant, so I think you don’t have to worry about that.
Almost all of Network Adapter that are available for several years now are in fact PXE compliant, so I think you don’t have to worry about that.
(Optional) And if we want to create our own unattended files:
- Windows Automated Installation Kit (WAIK).
We will use of this kit the Windows System Image Manager to create our Unattended Files for installation. Here’s the link to download the DVD image for installation.
We will use of this kit the Windows System Image Manager to create our Unattended Files for installation. Here’s the link to download the DVD image for installation.
Hardware Requirements
- Processor: No special specs on processor characteristics, but of course to WDS work properly you will need a Pentium III 800 MHz or higher.
- Memory: 256mb minimum.
- HD: Recommended 30 GB of free space on the disk that will be used for images storing.
It always depends on the images amount of images you will use to deploy. For example, I have over 5 full Vista images (meaning operating system, Office 2007 and several other applications) and less than 10 GB of disk space used.
It always depends on the images amount of images you will use to deploy. For example, I have over 5 full Vista images (meaning operating system, Office 2007 and several other applications) and less than 10 GB of disk space used.
Installation
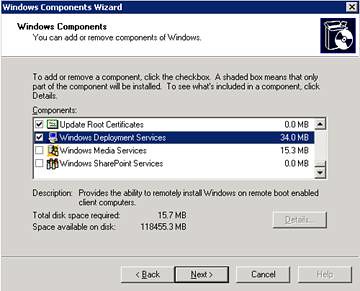
To install WDS on a Windows Server 2003 SP2 you only need to add the component from “Add or Remove Programs”
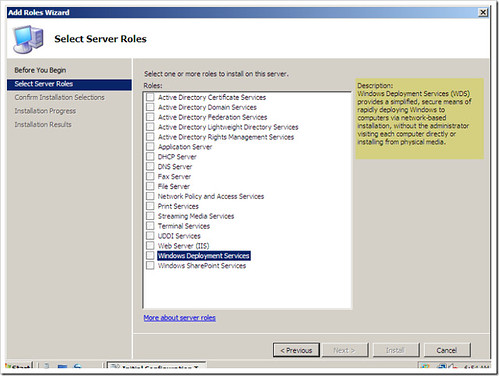
To install it on Windows Server 2008 it is practically the same procedure, just add the Windows Deployment Services role from the “Add Role Wizard“. After that, all the configurations tasks are the same, since it is the same snap-in; and you’ll get bonus options using WDS on W2K8, like multicasting transmissions. I’ll comment this on the next posts.
* To install Windows Deployment Services on Windows Server 2003 SP1 first you must install the “Remote Installation Service” (RIS) component, you will not need to configure anything special with this component. After that, you have to use WAIK media: in the options you will find the Windows Deployment Services for installation.
Configuration
Once installed, access the “Windows Deployment Services” snap-in.
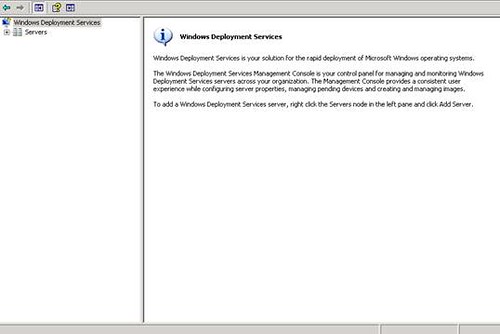
On the console, to get started right-click on the listed server and select “Configure Server”.
Here are the considerations you need to have to configure your server properly.
Configuring the Server
- After you selected the folder where you are going to store all the images for WDS, you need to check on the DHCP settings. The wizard will explain you about this option.
Since in my example I have a Microsoft-DHCP Server working on a different server from the WDS, these two options will remain unchecked. If you have both, WDS and DHCP, on the same server you should check both options. 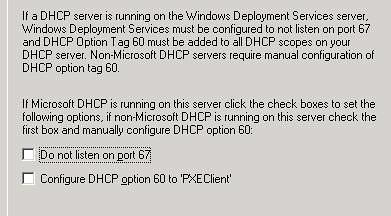
- Response Configurations: This is where you set to which clients you will respond when you receive a PXE request.
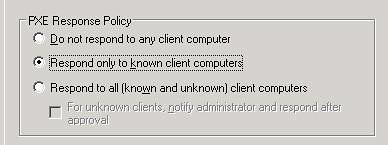
The difference between known clients and unknown is set on if the Computer Object exists on Active Directory.
If you want to create the computer objects before running WDS on that computer, you should have the GUID of that computer and include that information on the computer object. When you create the object on Active Directory, using “Active Directory Users and Computers” you need to set that “This is a managed computer” and insert the GUID.

Selecting this option can be really annoying if you want to improve your deployment, because you have to add the object first on Active Directory every time that you want to deploy an image, but it’s of course the more secure option to apply.
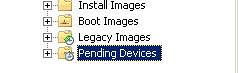
Or you can use the option “For unknown clients, notify administrator and respond after approval”. With this option, all the unknown clients that request to boot from PXE will appear to you in“Pending Devices” on your console, from there you can approve or decline them.
Or simply use the option “Respond to all (unknown and known) computer clients” and when you don’t need WDS, you can just stop the service to avoid any rogue clients.
On the final step of the wizard, select to start adding images now are we are ready to go!
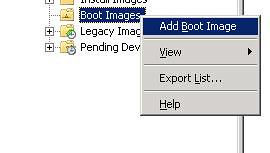
Adding Boot Images
Before creating a complete image to be deployed with WDS, we need to add first a Windows Pre-Installation image (WindowsPE). With this image we provide the server with a pre installation environment needed for all installations. WindowsPE comes, as all the new operating systems, in a WIM format, included in the Vista or Windows 2008 installation media.
1 - To add the image, expand the server options on the console and on the “Boot Images” select “Add Boot Image”. Remember that this WindowsPE that we are adding will be the same for all the operating systems that we are going to use with WDS.
2 - Select “Browse” and check on the Vista or Windows 2008 installation media for the folder “Sources” and the file “boot.wim”. This is our WindowsPE.
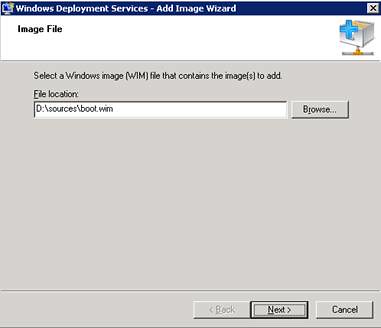
3 - Select the name for this image and click on “Next”
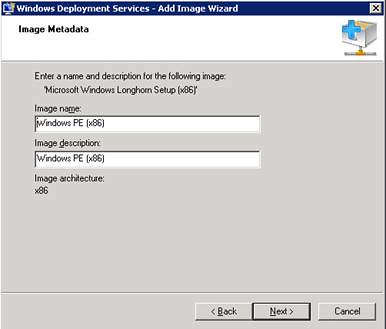
Note: You can also use, of course, the x64 WindowsPE. Will be discussing it later.
4 - Review the summary and click on “Next”.
And now the Windows Pre-Installation Environment is available to boot from your network.
A clean Vista installation?
The procedure to add a clean Vista installation to WDS it’s pretty simple and practically the same procedure as for the boot image. As a good practice you should always have a clean Vista installation available on your server, here are some reasons:
1 – The unattended files that you may use on full images deployment also apply to clean installations.
2 – WDS use a smart storage method, which does not duplicate any installation files. Meaning that if you save a clean installation of Vista and you add later a full Vista image with several applications included, all the new information that is stored are the differential (delta) files between those two.
3 – Rearm activations: If you use the command line “slmgr –rearm” on the Vista installations to reset back your grace period back to 30 days, you should know that Vista only allows 3 times to run this command. But when you deploy a full image, the times that you can run this command line reduces according to the time when the image was created. But using the clean WIM file extracted from the Vista media, does not have that drawback when you run the rearm command.
4 – Having a clean installation always available that you can deploy any time will help you when you need to make changes to the default installation image or when you need to start a new one from the scratch.
Here are the steps (again, you have to use the Vista installation media):
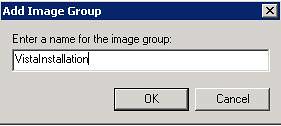
1 – On the WDS console, right click on “Install Images” and select “Add Image Group”

2 – Select the name that you are going to use for this group. For Example: VistaInstallation.
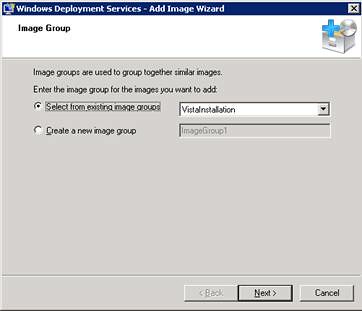
3 – Right click on “Install Images” again and select “Add Install Image”. When the wizard starts select to use the group you’ve just created and click “Next”.
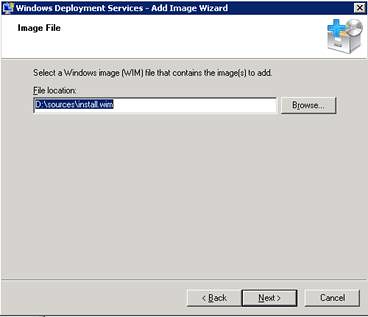
4 – On the next window, browse the Vista media for the folder “Sources” and select the file “install.wim” and click “Next”
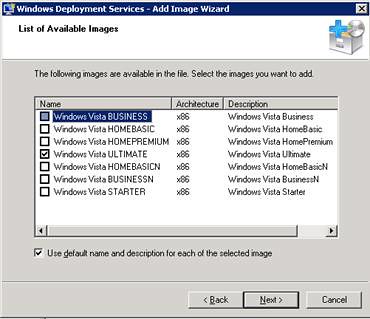
5 – Since the Vista installations always include all the versions on the same file, we should select only the one that apply for our case. In my case, Windows Vista Ultimate. Click “Next”
6 – On the summary window click “Next” and the image will start to upload to your server.
At this point we have all the necessary components to deploy a clean image for Vista from the network; but the installation remains attended. So, the disk configuration and the Vista options (language, product key, computer name, etc) still need to be manually inserted.
We’ll be reviewing in the next posts a complete unattended installation for Windows Vista and also making a personalize installation of the operating system
We’ll be reviewing in the next posts a complete unattended installation for Windows Vista and also making a personalize installation of the operating system
No comments:
Post a Comment